Making our customers happy is the number one rule at LiveChat. In this next part of our LiveChat Workshop series, we want to show you how to get more out of your LiveChat license – all of that with the use of a simple yet powerful tool – Postman.
With today’s LiveChat Workshop, you will learn:
- What is Postman?
- Why do we use Postman at LiveChat?
- How to authorize and execute your API calls in Postman?
- What API calls are available at LiveChat and how to filter them?
Also, in the last section of this article, we’ve prepared a special treat for you – hope you’ll like it!
What is Postman?
Postman is a tool that allows you to quickly deploy API calls for both testing and development. With just a few clicks, you can check out if one or several of your API endpoints are functioning properly, debug them in case of any problems, or even use it to determine the uptime of your API services.
Those are just a few of the many useful features of Postman. To check out all of them, be sure to visit www.getpostman.com.
Why do we use Postman at LiveChat?
There are several reasons that made Postman our number one tool when it comes to both testing our API endpoints and gathering additional information from LiveChat licenses.
1. Easy navigation
Yup, you heard that right. Postman’s UI makes calling our API so easy that not only is it used by our Developers and Technical Department, but also by our Support Heroes (themselves!). With just a few easy steps, you can create an API call by:
- Choosing a method.
- Providing the request’s URL.
- Choosing the type of authorization.
- Adding some additional parameters to both Header and Body of your API call.
Regarding the simplicity, it beats a regular cURL, doesn’t it?
2. Speaking of cURLs
After preparing and deploying a call, we often hear that our customers would like to test the specific API endpoint on their own. And sometimes they may not want to use Postman, but rather some other method that will be compatible with their current workflow.
Since not everyone can write an example in cURL or Python, Postman is there to help. After preparing your call, simply click on the Code button, and choose which method you would like Postman to prepare.
And, that’s it! You can now share your code with a customer, making both your and your customer’s life easier.
curl --location 'https://api.livechatinc.com/v3.5/configuration/action/get_agent' \
--header 'Authorization: Bearer dal:test_-AvZSSODKkZsrjoPkQ' \
--header 'Content-Type: application/json' \
--data-raw '{
        "id": "smith@example.com"
      }'
3. Storing all those API calls in one place
You have probably found yourself in a situation where you have faced multiple customers, asking for the same API requests. Memorizing the entire API documentation may seem like a fun hobby, but we have a better and more convenient solution – Postman Collections.
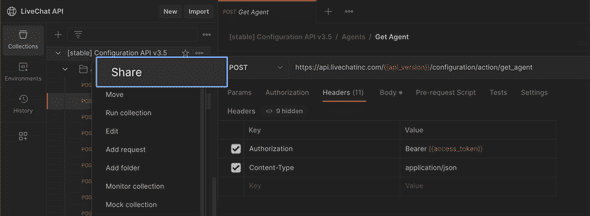
With just a click of a button, you can add, customize, and save your API call and store it in your Postman Collections, waiting for you to use it later. What’s more, you can save and share your brand new Postman Collection with your customers and coworkers alike!
OK, so now that you know why we use Postman at LiveChat, it is time to learn how you can use Postman to your advantage with your LiveChat license!
Learn how to run API calls with Postman
First of all, if you are not yet equipped with Postman, make sure to grab it from the official website. It will make the usage of all of those LiveChat API calls a blast.
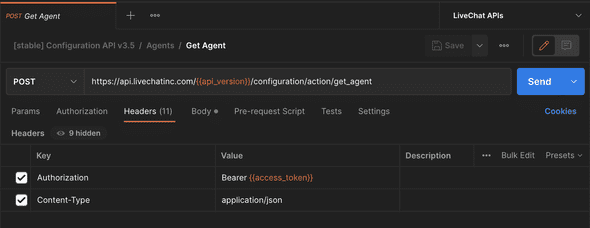
Before making your first API call, you have to know how to authorize each and every API request. For that, you’ll need to add the following attributes to your Postman’s Headers section.
--header 'Authorization: Bearer access_token'And how to get the Access token? To do that, follow the simple steps listed below.
1. Create a new app in your Developer Console
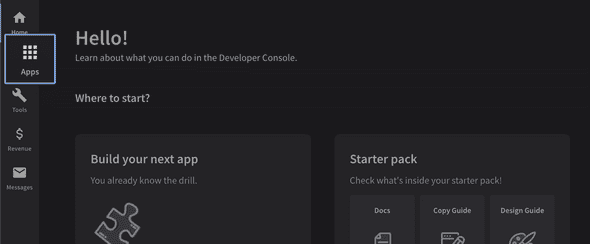
First, log in to your LiveChat’s Developer Console and go to the Apps section.
To proceed with creating a new app, click on the Create new app button in the upper right corner. We will leave the naming to you!
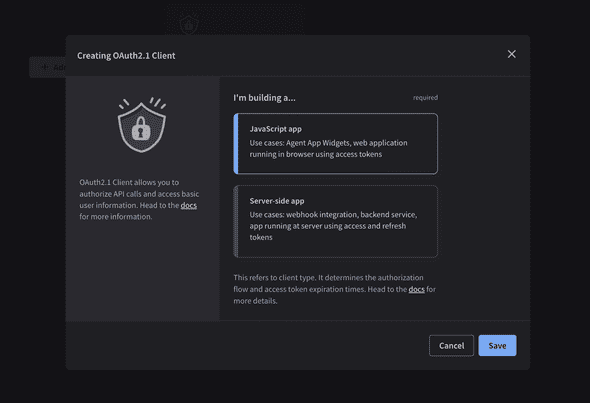
Now, proceed to the Building Blocks section of your new app and add the App Authorization Building Block. While there, select the JavaScript app type.
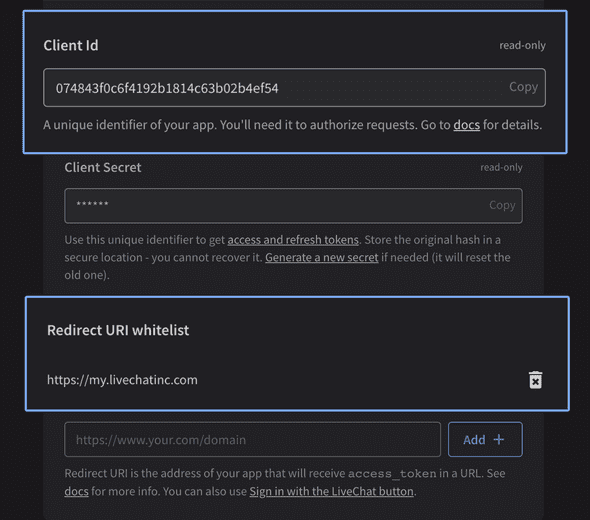
Once you’re inside the App Authorization Building Block, copy the provided Client ID and add https://my.livechatinc.com to your Redirect URI list – we will need them for later.
On the same App Authorization block, you’ll also need to set up the right scopes for your application. So what are the application scopes? Putting it simply, they allow you to decide which parts of LiveChat API can be accessed by your application.
For testing purposes, you can mark all of the available scopes to reveal the full potential of the LiveChat API. For production apps, select the scopes appropriate for the endpoints your app will use. Check out our docs for more detailed information about scopes.
After assigning the scopes, click on Save Changes to finalize the process.
2. Generate your Access token
Now is the time to use the Client ID and Redirect URI that you have copied before. Take a look at the following URL:
https://accounts.livechat.com/?response_type=token&client_id=496dfcbf0526410ce72fbeb6&redirect_uri=https%3A%2F%2Fmy.livechatinc.comThis URL contains a sample Client ID and Redirect URI. Grab the link from above, making sure to replace those parameters with the values copied from the App Authorization block of your app, and run it in your web browser of choice. As the result, you should be redirected to LiveChat Application but with one difference.
Take a look at the URL section of your web browser. You will see that the link to LiveChat’s Web Application now includes your access token:
https://my.livechatinc.com/#access_token=BPQgoLQEOW&expires;_in=28800&scope;=agents_read,agents_write,archives_read,archives_write&state;=123&token;_type=BearerNote that your access token will be valid for 8 hours. After that time, you will have to generate a new token by following the exact steps described above.
Copy it and paste as the header when running a Postman call, just like on the following example:
Now that you have your access token, you can use various endpoints available in our API to gather additional information from your LiveChat or perform additional actions on your license, like adding new agents or editing your current greetings.
So, now that you know everything you need to authorize and run your requests, there is one question that still remains:
What are the available API endpoints and what parameters can you use to filter your requests?
API calls available in LiveChat
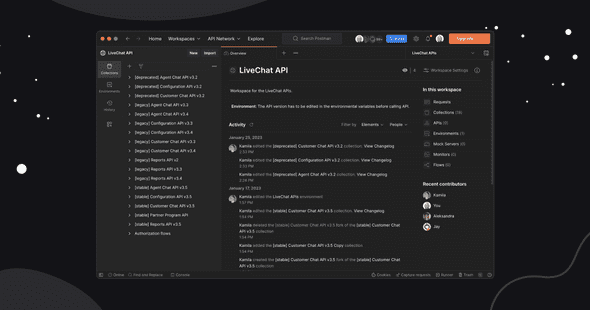
Setting up your Postman and acquiring your access token might have taken up some time, so we’ve got a special treat for you. We’ve prepared a dedicated Postman workspace that includes all of the available LiveChat API calls – just follow the link to check it out.
If you have installed Postman on your computer, this button will automatically allow you to use all of the available LiveChat API calls and save them as your own collections. Simply switch out the variable data, such as an access token, in the environments section with your own credentials and you’ll be able to instantly call our APIs.
To customize the LiveChat API Postman requests to your own needs:
- Check out the workspace.
- Choose which request you would like to run.
- What optional parameters you would like to apply to filter your request.
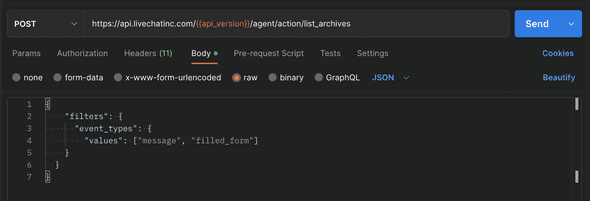
All of the available parameters are listed in our documentation for each endpoint, such as List Chats.
The thing to remember is that all of the optional parameters should be passed in the body of the request you’d like to call.
We’re hoping this article not only pointed out the benefits of using Postman, but also helped you find and run useful API calls with LiveChat.
If you have any additional questions about how we use Postman at LiveChat or wanted to know more about our API, check out the LiveChat for Developers Discord server! Both us and the whole community will be more than happy to help.
